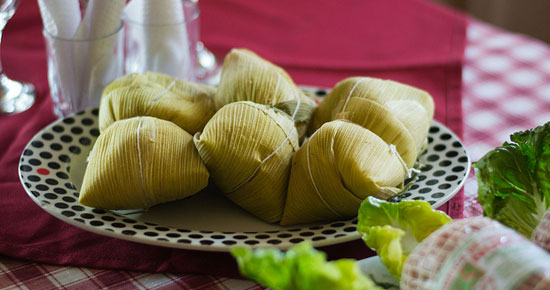
Humitas are one of the classic pre-Columbian foods of Latin America – the name comes from the Quechua language, and varieties of humitas can be found outside Chile in Argentina, Bolivia, Ecuador and Peru. In Chile, they are one of the iconic dishes that announce the heyday of summer, along with other traditional favorites like pastel de choclo and porotos granados. Chilean humitas are unique in their simplicity and freshness, served either sweet – with a teaspoon of sugar on top – or savory, with an ensalada chilena of raw onions and tomatoes. And don’t expect a Mexican-style tamale: suggesting cheese or meat inside a humita is tantamount to sacrilege in a Chilean kitchen. Vegetarians and vegans in Chile, be aware that many – but not all – of the humitas sold in restaurants contain lard (“manteca”). Simply switching vegetable oil for lard, however, makes this a tasty dish for every diet.
Humitas Yield: about 15 humitas
Ingredients: 10 ears of corn in the husk – make sure to buy the big, white corn with smaller kernels, not the smaller, sweet yellow corn (known as “choclo americano”). Experts say that it’s best to use older, firmer corn for making humitas. 3 large onions 1 cup of fresh basil leaves 2 tbsp. vegetable oil, plus oil for sauteing onions 2 tsp. salt Optional: spicy green “aji” chili peppers, to taste
Preparation: With a large knife, cut a groove around the base of the ear of corn, severing the corn leaves from the base in a straight line, without severing the butt of the corn. Peel corn leaves carefully and set aside for later. Cut the kernels off all the ears of corn and set kernels aside in a large bowl. Dice the onions and saute with oil and salt. Meanwhile, set a large pot of water to boil – it’s ideal for all the humitas to cook at the same time and temperature, so make sure there is plenty of room. Grind corn kernels with a food processor or immersion blender (“minipimer” in Chile), together with the salt, oil and basil. Add onions. Be thankful for technology – this used to be done exclusively by hand mill, one small cup of corn at a time. Gather the corn husks. For a new humita-maker, this is the most daunting part – but also the most fun, once you get the hang of it. Start by matching corn leaves that are roughly the same width at the flat, broad end (where you cut the leaves with the knife). Set aside pairs until you have 15, plus a couple of extras. When choosing leaves, discard any of the tough, outer husks or the thin, inner husks. For a truly traditional look, you can make the ties that hold the humitas together, using the leaves themselves. With some of the thin, inner husks, tie a knot at the pointy end of the corn leaf. Holding the broad, cut edge of the leaf, rip the leaf in half until you reach the knot, forming one long strand of corn leaf with a knot in the middle. Or, just cut 15 pieces of string. Now, take the pairs of corn leaves and arrange them in a diamond shape, with the pointy ends facing opposite directions and the broad ends overlapping. Fold over one of the pointy ends and fill the “cup” with several spoonfuls of humita mixture, until it’s filled past the part where the leaves overlap. Now, fold the other end down so that the tips are overlapping, and secure tightly with a tie. Continue preparing the humitas and set aside in a shallow tray until they are all prepared. Boil the humitas for 10-20 minutes, until corn leaves are completely yellow. Remove from water and serve immediately. Humitas can also be frozen for up to six months, so you can treat your future self to a sweet bite of summer during the winter months.